
- Actuators
- Adapters
- Air Blowers
- Air Conditioners
- Air Curtains
- Air Purifiers
- Anemometers
- Axial fans
- Ball Valves
- Belimo
- Blowers
- Brackets
- Brass
- Brazing Rods
- Capacitors
- Carrier Parts
- Clamp Meters
- Cleaning Products
- Coatings
- Compressors
- Condensate Pumps
- Connectors
- Contactors
- Copper Capillary
- Copper Coils
- Copper Straight Tubes
- Copper Strainers
24 Volts Thermostats : Wire Color & Label Guide

24 Volts Thermostats : Wire Color & Label Guide
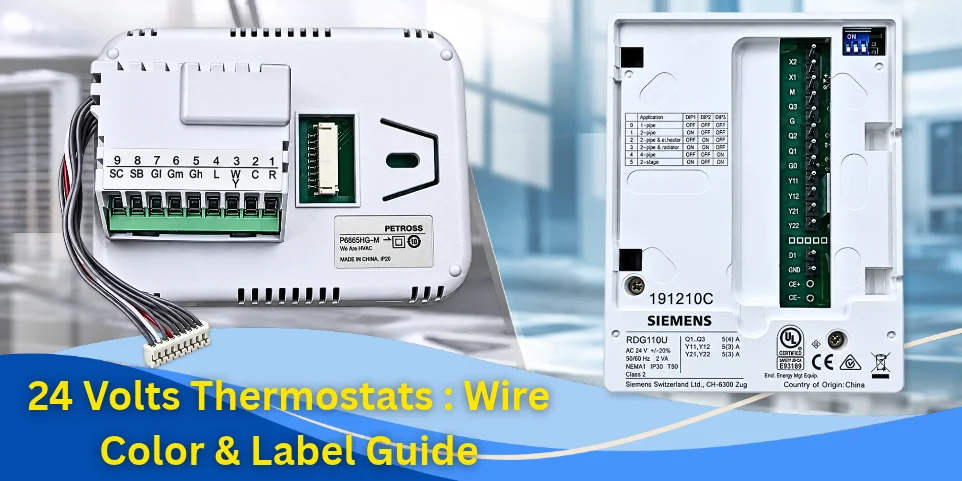
To understand 24V thermostat wiring, we will compare the Petross P6865HG-M and the Siemens RDG110U thermostats.
Both operate on safe 24VAC Class 2 power, meaning they share the same voltage infrastructure but handle hardware installation and valve signals completely differently.
24V Model Side-by-Side Terminal Mapping
| Function | Petross P6865HG-M | Siemens RDG110U | Architectural & Functional Shift |
|---|---|---|---|
| 24VAC Power (Hot) | Terminal 1 (R) | G | Direct crossover; supplies the main 24V power line. |
| 24VAC Common / Ground | Terminal 2 (C) | G0 | Direct crossover; completes the low-voltage power loop. |
| Low Fan Speed | Terminal 7 (Gl) | Q1 | Standard multi-speed fan mapping. |
| Medium Fan Speed | Terminal 6 (Gm) | Q2 | Standard multi-speed fan mapping. |
| High Fan Speed | Terminal 5 (Gh) | Q3 | Standard multi-speed fan mapping. |
| Cooling Valve Control | Terminal 3 (W/Y) | Y11 & Y12 | Major Shift: From 0-10V Modulating to Isolated On/Off Pair. |
| Heating Valve Control | Shared on Terminal 3 | Y21 & Y22 | Major Shift: Siemens provides a completely dedicated second loop. |
| Remote Setback / Cards | Terminal 8 (SB) / 9 (SC) | D1 & GND | Functionally identical hotel/occupancy sensor inputs. |
Deep Dive Analysis:
1. Modulating Signal vs. On/Off Switching
- Petross P6865HG-M: Uses a sophisticated 0–10V DC modulating output on Terminal 3. It tells a motorized valve to open partially (e.g., 30% open, 70% open) for highly precise temperature control.
- Siemens RDG110U: Drops the modulating signal entirely in favor of digital On/Off switching.
2. Shared Terminals vs. Isolated Power Pairs
- Petross P6865HG-M: Relies on a shared internal power loop. The thermostat sends its own 24V power out through Terminal 3 to trigger your equipment.
- Siemens RDG110U: Uses completely isolated dry contacts for its valves (Y11/Y12 and Y21/Y22).
- The Wiring Change: You cannot just plug one wire into the Siemens valve section. You must bridge 24V hot (G) over to Y11, and then run Y12 out to your physical cooling valve. It requires jumper wires on the backplate.
3. Integrated Ribbon vs. Split-Base Mounting
- Petross P6865HG-M: Uses an integrated terminal housing on the wall plate that links to the front screen via a delicate grey 8-pin ribbon cable bundle.
- Siemens RDG110U: Eliminates loose ribbon cables completely. It uses a heavy-duty pass-through male pin header bar. The wires screw into a separate plastic backplate, and the screen module firmly snaps directly onto those rigid pins.
4. Hardcoded Software vs. Physical DIP Switches
- Petross P6865HG-M: Relies on pre-programmed internal firmware to determine how the system behaves.
- Siemens RDG110U: Features a physical blue DIP switch box in the top right corner. You must manually toggle these white sliders to match the printed diagram on the plastic housing. If these switches are set incorrectly (e.g., set to a 4-pipe system when your building uses a 2-pipe system), the thermostat will fail to trigger the fan or valves when calling for climate control.
Checklist:
Before choosing the model of 24 volt thermostat, you will need to figure out the following:
- If your system is using chilled water, are you currently using a 2-pipe (chilled water only or shared loop) or a 4-pipe (dedicated hot and cold water lines) system?
- Does your wall water valve actuator explicitly say 0-10V / Modulating, or does it say On/Off (24V)?